
Colonial Williamsburg Classes
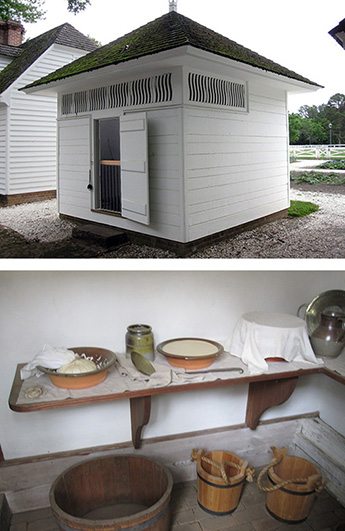
Views of out and inside the Wetherburn Dairy, subject of Patricia Richards’ class.
With the much anticipated Maysville Study Program front and center in many peoples’ minds, the preregistration deadline for the Williamsburg Study Program is rapidly approaching, seemingly very much under the radar. This study program, which has been a yearly fixture in Colonial Williamsburg for more than 20 years, is a fabulous post-holiday get-away. Virginia’s Colonial Williamsburg is a fabulous location for this little retreat with its plethora of lovely historic buildings, relatively mild, mid-winter weather and reasonable hotel prices.
Like all past programs, this year’s Study Program has four great classes on the schedule, taught by experienced Artisan and Fellow members of the Guild, with projects drawn from the collections of Colonial Williamsburg. Pete and Pam Boorum will be teaching an 18th century side table that hails from their home state of New Hampshire. Jane Graber will be instructing her students in the shaping and decorating of red ware plates, bowls and platters. Patricia Richards will guide her students through construction of a 1/12 scale version of the Wetherburn Dairy that sits behind the tavern of the same name on Duke of Gloucester Street, and Bill Studebaker will be helping his students build a dressing glass (mirror) patterned on one that has come to this historic town from Charleston, South Carolina.
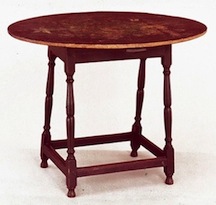
The 18th century New Hampshire side table that is the inspiration for Pete and Pam Boorum’s class.
For those that are interested, there is also an exclusive behind the scenes tour to visit the warehouse where are stored the architectural fragments from Williamsburg’s important colonial structures. The study of these fragments provides restorers an invaluable stream of information from which informed guesses can be made as to which materials and colors would be most appropriate for their work.

The dressing glass (mirror and drawer) originally made in South Carolina, that will be the inspiration for Bill Studebaker’s class.
As part of the study program, registered students and guests each receive a pass that admits them to Colonial Williamsburg museums and historic buildings for the duration of the program; as well as affording them a discount on their purchases there. The special IGMA rate at the Lodge is good for days before and after the program so you can stay as long as you want. Information and registration forms can be found a www.igma.org.

Jane Graber will be teaching her students to shape and decorate platters, plates and bowls in the same manner their colonial ancestors did in the 17th and 18th centuries.
